de en


Setups: Opt-in setup

In the 'Opt-in setup' menu, you create opt-in forms to embed on your website. You arrange the fields via drag&drop. emma generates the form source code for your website automatically.

To help you get started quickly, emma contains a demo opt-in setup.

Use the icons to 'Edit' existing setups, 'Move' them to subfolders or 'Copy' them, and use the trash can icon to 'Delete' them.

If you have moved an opt-in setup to a subfolder, you can get there via 'Open folder'.

Preparing a working opt-in setup

First create all the ingredients in emma that you will later use in the opt-in setup:

  • Subscriber lists: Create the subscriber list to which you subscribe your new subscribers. Optionally, you can also define several lists per opt-in setup, to which the new subscriber is assigned at the same time.
  • Subscriber fields: Create the subscriber fields to be filled in on the opt-in form, e.g. email address, last name, first name.
  • Dialog mails: Create short mailings (see 'Creating a new email') that are sent as confirmation after the subscription. For this purpose, a mailing must have the type 'Dialog mail' and the status 'activated' (see 'Advanced settings'). Only if both conditions are met does the mailing appear in the selection list when you set up the opt-in setup.

Legally compliant subscription under the GDPR

A legally compliant opt-in form should contain the fields and notes listed in the last section.

Creating a new opt-in setup

Click 'New opt-in setup' at the top right. Give the setup a name and (optionally) a description.

Basic settings

Select the 'Mode' of your opt-in setup. The legally compliant subscription variant is the double opt-in, optionally with an additional welcome message.

  • Double opt-in plus welcome message: The prospect fills in the opt-in form and submits it. A short confirmation message appears, for example "Please confirm the activation link in the message we sent you". An opt-in message containing an activation link is then sent to the email address entered. Up to this point, the prospect does not yet exist as a subscriber in emma and the subscription is not yet legally valid. The opt-in message should therefore not contain any advertising content. It may be designed in your corporate design and should only contain a short explanation in addition to the activation link. By clicking the activation link, the prospect agrees to receive the newsletter a second time (hence "double" opt-in) and thereby confirms that they own the subscribed email address. This is confirmed to them with the message 'Subscription successful'. This completes the double opt-in. In addition, the newly won subscriber receives a welcome email, which may now also contain advertising content.
  • Double opt-in: As described above, but without an additional welcome message. The successful subscription is only indicated on the website.
  • Confirmed opt-in: After submitting the opt-in form, the prospect is subscribed immediately, i.e. misuse by third parties is possible here. In addition to the message on the website, they receive a welcome message by email.
  • Single opt-in: As described above, but without an additional welcome email. The successful subscription is only indicated on the website.

To select a specific email as the opt-in message or for the welcome, the type 'Dialog mail' must be set in the respective mailing under 'Advanced settings' --> 'Behavior'.

You can have copies of the dialog emails sent to one or more email addresses (separated by commas or semicolons) as proof of the subscription.

Advanced settings

E-mail forwarding
Enter your own email address in this field if you want to be informed by email about every single subscription. You can also enter several addresses separated by commas (without spaces).

HTTP forwarding
This field lets you pass the data of the subscribed subscriber to a URL on your own server using the POST method, including your own parameters.

Example entry:

http://www.example.com/?shop_id=7

Assuming the new subscriber has the ID 89 and was subscribed to lists 3 and 5, and form field 33 was selected (checkbox, e.g. for profiling consent), your server receives the data as follows:

Array
(
[shop_id] => 7
[id] => 89
[lists] => Array
(
[3] => 1
[5] => 1
)

[fields] => Array
(
[1] => user@example.com
[33] => on
)
)

Mailing to send to new subscribers

If you wish, the mailing set here is sent automatically to every new subscriber who subscribes via this opt-in setup.

What makes this special compared to a welcome email or a welcome campaign is that you can automatically send the latest issue of a newsletter.

How it works:

  • Open the current mailing draft of your newsletter series. In the late send setting of the mailing, select the matching opt-in setup.
  • Send the mailing as usual. The mailing is now entered in the opt-in setup and the late send is activated.
  • Next round: Copy the last issue from the mailing archive and create the new issue from it. The late send setting is copied as well.
Goal achieved! With every new send, the current mailing is automatically entered in the opt-in setup and the late send setting is updated.

If you do not want this dynamic behavior, select the late send mailing in the opt-in setup and do not activate the late send option in the individual mailings.

Duplicate matching

If a duplicate matching setup with the follow-up action 'Merge' is selected, duplicate matching takes place directly during the subscription. This way, you collect all activities (clicks, openings, interests) cleanly per recipient from the start and avoid multiple deliveries. The matching always covers the following lists together:

  • lists set permanently in the opt-in setup ('Subscriber lists' tab) and in the duplicate matching setup
  • the lists selected by the user in the opt-in form, if you offer a list selection in the form

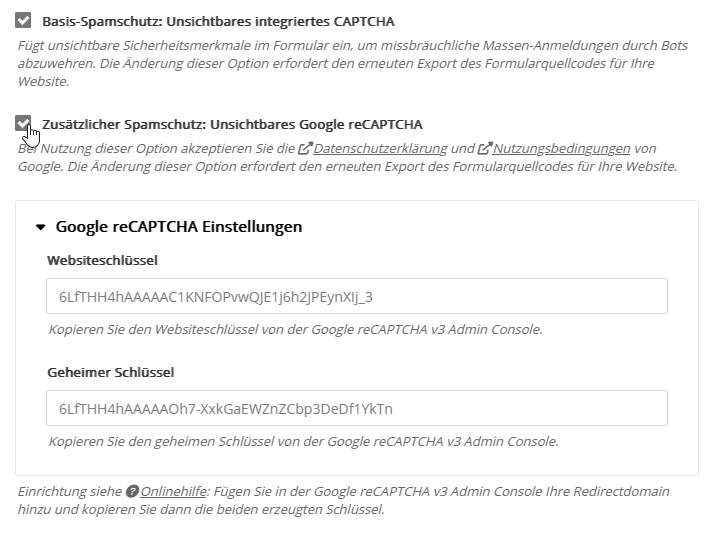
Basic spam protection: invisible integrated CAPTCHA
This option protects your opt-in form from misuse by bot-controlled mass subscriptions. To do this, invisible security features are inserted into the form. If the form was not filled in by a human, the subscription is to be ignored.
The function is designed so that you do not lose any human subscriptions; in case of doubt, it rather accepts a few spam subscriptions.

Additional spam protection: invisible Google reCAPTCHA
To use this option, first set up reCAPTCHA in your Google account:

  • Go to https://www.google.com/recaptcha/admin. This opens the "Register a new site" form.
  • Enter a label of your choice, for example one that matches the name of the opt-in setup.
  • Select "reCAPTCHA, version 3" and add the domain your account uses as its redirect domain.
  • Accept the terms of service and submit the form.
  • Copy the generated site key and secret key into the input fields of your opt-in setup.

In the Unconfirmed double opt-in expires after (x days) area, you define after how many days unconfirmed double opt-ins are deleted. According to our statistics, 96% of subscribers click the confirmation link within the first 24 hours after receiving the confirmation email. The longer the confirmation is delayed, the more likely it is that the owner of the address has not consented to this subscription. The double opt-in procedure is meant to prevent exactly this for data protection reasons. Settings from 1 to 28 days are possible. The default is 14 days. 99.8% of confirmations arrive within this period.

Once the set period has expired, an unconfirmed subscription is deleted from our database and the confirmation link becomes invalid. It no longer appears in the Opt-ins menu and is no longer available via the webservice.

Subscriber lists

On the 'Subscriber lists' tab, you select the list(s) to which new subscriptions are added.

Form

On the 'Form' tab, you design your opt-in form.

The view consists of two areas: on the left you see the preview, on the right all available elements and editing options.

Every change is immediately visible in the preview. The three basic steps are:

  • Insert an element: Drag the element you want from the 'Element pool' (right side) into the form.
  • Change the position: Move the element within the form to the position you want via drag&drop.
  • Edit an element: As soon as you select an element in the preview, the 'Edit element' tab opens on the right side. Here you adjust the properties of the selected element, e.g. the label or width.

The right side shows 4 tabs for editing the form:

Tab #1: Element pool

Here you find all elements that can be inserted into the form. To place elements side by side instead of one below the other, simply change their width, e.g. from 100% to 50%.

  • Headlines, texts and spacers provide information and visual structure.
  • Subscriber fields take the user's input, depending on the field type as a text field, date field, checkbox(es) or selection list.
    → Note on the field type 'List of countries' in an English-language form: The country names are inserted in the language you selected as your own user language in the 'Custom settings -> System settings' menu. So before inserting the field, briefly switch your user language to English, insert the field, and then switch your user language back to German.
  • Subscriber list selection: Following the principle "one subscriber list per topic", you offer various topic newsletters for selection in the form. If the user selects the topic "Travel tips", they are added to the "Travel tips" list, and so on. Alternatively, you can separate topics with a subscriber field with selection options, which you then address via different target groups. Separating by "one list per topic" makes sense if the topics do not overlap and it should later be possible to unsubscribe separately by topic (=list). The list selection can be inserted as a single or multiple selection. For the appearance, select either 'List' or 'Radio buttons' on the 'Edit element' tab. In addition to the lists in the form, the new subscriber is also subscribed to the lists you activated on the 'Subscriber lists' tab.
  • Linked opt-in setups: Following the principle "one setup per topic", you offer various topic newsletters for selection in the form. You combine the convenience of a single form with the properties of several setups, in particular their dialog emails. If the user selects the topic "Travel tips", they receive the dialog emails (confirmation link, welcome) of the "Travel tips" setup. Once the double opt-in for this topic newsletter is completed, they are added to the "Travel tips" list (according to the 'Subscriber lists' tab of the setup). This process is repeated for each selected topic (=setup). If entered, the copies of the dialog emails and the email forwarding are also sent per setup.

Tab #2: Edit elements

When you select an element in the draft on the left, the 'Edit element' tab opens on the right. The following screenshot shows this using the example of the 'Email' field:

Subscriber fields have the following properties:

  • Width: The default is 100%. If you want to place two fields side by side, set both to 50%.
  • Label text: The default is the name of the field. The label appears in bold above the input field. You can adjust it in the form as you like or leave it empty.
  • Description: The description appears below the input field. Here you can, for example, point out a required field.
  • Required field Yes/No and error message text: If a field is defined as a required field, an error message is shown if the field is not filled in. You can enter a separate error message text for each required field. Please avoid unnecessary required fields! In Germany, the principle of "data avoidance and data minimization" applies in accordance with Section 3a of the German Federal Data Protection Act (BDSG). For subscribing to a classic email newsletter, required fields other than the email address are taboo. Only define fields as required fields if their data is absolutely necessary for the subscription (for example, to an event).
  • Hidden field (hidden field): If you want to pass a fixed field value with the form, first insert the field in the form and then convert it to a hidden field. To make sure that security-relevant information is really hidden, emma stores all hidden fields internally with the respective setup and does not insert them into the form source code. Hidden fields are often used to record the entry point (which form, which website) of the new subscriber.

If you want to collect personal usage data (clicks, openings), consent should be obtained via a separate checkbox in the form, see also 'No newsletter without consent' and 'Collection of personal data (user profiles)'.

The field types Single selection or Multiple selection (e.g. the salutation with the options Mr/Ms) have additional settings for 'Appearance' and 'Selection options'.

The same applies to the selection elements Subscriber lists and Linked opt-in setups:

For the Appearance, select either 'List' or 'Checkboxes' (single selection) or 'Radio buttons' (multiple selection).

In the 'Selection options' area, you define whether all or only certain field options (or lists or setups) are offered in the form. Use the icons on the far right to change the order of the options via drag&drop or to hide options.

In the left column of the table, you adjust the name with which each option should appear in the selection list. On the right side, you see the original name (value) of the field option for information (cannot be changed). For a list or setup selection, the ID is displayed.

Use the 'Add selection option' link to add previously hidden or newly added options to the selection at any time.

Tab #3: Layout

Here you define the general look of your form, such as font, colors and inner/outer spacing. Every change is immediately visible in the preview.

Tab #4: Test and source code

Before you embed the form source code on your website, please test the subscription process using the 'Test form' button.

A real subscription takes place, i.e. you test not only the look and usability of the form, but also whether the data is passed on correctly. Is the error message for required fields that are not filled in helpful? Are the correct dialog emails sent? Does the double opt-in confirmation work? Do the dialog pages you set up appear? Was the new subscriber added to the list you want? Were all entries saved to the fields?

If the test was successful, export the automatically generated form source code and insert it on your website.

Dialog pages

If a subscription succeeds or fails, emma shows a standard text message, e.g. "Your subscription was successful, thank you."

However, we recommend that you store your own web pages as dialog pages, to which the new subscriber is redirected depending on the result of the subscription. Sparkassen Finanzportal will be happy to create dialog pages based on your corporate design.

Newsletter subscription compliant with data protection

Not just since the introduction of the General Data Protection Regulation (GDPR), the following applies:

Please do not send newsletters unless the prospect has given you explicit and verifiable consent. The emma opt-in form takes care of this.

We would like to give you some notes on this. However, they do not claim to be complete, nor do they constitute or replace legal advice. You can find recommended standard texts and further information, for example, in the Guideline for permissible email marketing of eco, the Association of the German Internet Industry.

Your subscription process should use the Double opt-in or Double opt-in plus welcome message mode. This way, as the sender, you can prove that consent was actually given by the owner of the email address and not misused by a third party.

The form should contain all the information the prospect needs to make an "informed decision":

Purpose limitation

  • Explain for what purpose the data in the form is collected and why this is also in the interest of the new subscriber.
  • What is the topic of your newsletter? How often and through which channel is it sent? emma lets you send by email, SMS and postcard.
  • Data minimization: Only define a field as a required field if its data is absolutely necessary to fulfill the purpose. Example: For subscribing to a general email newsletter, you may ask for the prospect's salutation and name, but please do not define any field other than the email address as a required field.

Unsubscribe link

  • Point out that every newsletter sent contains a link that can be used to unsubscribe from the newsletter at any time.
  • Use the Single opt-out mode in the linked opt-out setup. Unlike the subscription, unsubscribing should take effect immediately, without requiring any further confirmation. If you want to ask for the reason for unsubscribing, a dialog page after successful unsubscription is a good option.

Collection of personal data (user profiles)

This section is particularly relevant for you if the permission for subscriber profiling has been activated for your account. This is the case if the Subscribers -> Subscriber fields menu contains a Profiling field with the field type 'Consent to the collection of personal usage data'.

If this field exists in your account, a subscriber's usage behavior can be recorded not only anonymously but on a personal basis after the subscriber has given explicit consent. This means opens and clicks, for example in newsletters, landing pages and surveys. Only if these reactions are recorded on a personal basis can the subscriber later be identified via target groups such as "clicked link x". For example, the 'CampaignManager Advanced' module lets you send follow-up mailings automatically depending on certain interests or previous recipient reactions.

  • Add the subscriber field 'Profiling' to the opt-in form. With this checkbox, the subscriber can (but does not have to) consent to the personal collection of their usage data. The checkbox must neither be preselected nor be a required field.
  • Point out that receiving the newsletter is not tied to this consent and that the consent (if given) can be withdrawn at any time.
  • Link a profile manager in every newsletter you send. This lets the subscriber edit their personal data at any time, and the change is automatically taken into account in the system.

Note on target groups: The usage behavior of subscribers who have not given this consent (Profiling=0) is only available for anonymized evaluation and is only counted in the totals of the email statistics. It is possible to determine whether such a subscriber was a supposed recipient of a specific mailing. However, their reaction is stored without any personal reference. If your target group contains conditions such as "opened mailing" or "clicked link", such a subscriber can never be part of this target group. If, for example, you plan follow-up mailings to previous "non-openers", you should therefore always check for Profiling=1 as an additional condition.

Privacy policy

  • Create a new subscriber field of the type Checkbox and name it 'Privacy consent' or similar.
  • Insert this field into the form as a required field. The prospect must actively confirm that they have read your privacy policy. The checkbox must not be preselected.
  • Link the privacy policy in the description text of the checkbox, so that the prospect can read or download it as easily as possible.
  • Point out that you treat user data confidentially, use it exclusively for the stated purpose and do not pass it on to third parties.