|
This help page describes the newsletter editor versions 1 and 2.
We no longer provide support for this version.
Click here to switch to the help for editor V4 or check which editor version you are currently using.
If, when creating your mailing, you selected an email template, you can conveniently put together the structure and content of your email on the 'Contents' tab. In addition to the HTML part, the text part of your email is generated automatically.
If you did not select a template (see 'Creating content without a template'), the 'HTML' and 'Text' tabs appear instead, or only one of the two tabs, depending on the selected format (default: multipart format). Here you create the HTML code and the text part of your mailing manually.
If you are new to emma, please skip the following section. It is intended only for users who have been working with emma for some time.
Newsletter editor V1 or V2?
When creating your mailing, you can choose between version 1 and version 2 of the integrated newsletter editor. If this option is enabled in your emma account, you will find the 'Switch to new editor' button at the top right above your mailing.
As a rule, the new editor is the better choice, as it has two key advantages:
- Faster work: When you click the new 'Apply' button, your changes are visible in the draft immediately. The previous intermediate step of first saving each change on the server is no longer necessary. emma takes care of this in the background: your changes are saved on the server automatically several times per minute and when you leave the draft view. If you prefer to save manually instead, change the corresponding setting in the 'Custom settings' --> 'System settings' --> 'Autosave' menu.
- Direct access to images: From the new media sidebar, you drag and drop images directly into the element of your mailing that is currently open for editing. You can also upload new image files in the media sidebar without leaving the draft view.
The only exception: if one of your mailing templates has been equipped with the special functions 'Fill content via RSS feed' or 'Article import from OXID eShop', the new editor is not yet available for editing them. In this case, emma automatically opens the previous editor, and switching to the new editor is not possible.
Switching between the previous and the new editor
In the 'Modules' --> 'Templates' --> 'Email' menu, you can define for the selected template whether the old editor (version 1) or the new editor (version 2) is displayed by default. You will find this option in the 'Open with editor version' drop-down list:

If version 2 is selected, all drafts based on this template are opened with the new editor, including all existing drafts that use this template. The editor version selected last always applies.
Regardless of this, you can also switch between the old and the new editor directly in the draft view at any time:

'Contents' tab: the new editor
The screen layout
The draft view consists of four areas, from left to right:
- Element tree : shows the structure of your mailing; here you insert the elements you want that your template provides
- Draft: shows your draft in its original size
- Mini view: shows a reduced overview for quick navigation
- Media sidebar: shows all images in your Media administration and lets you insert new images by drag & drop

The four screen areas in detail:
|
--> The element tree
In the element tree (far left), you define the structure of your email, depending on the selected design template.
A design template consists of containers (dark background color in the element tree). They are firmly defined in the template (e.g. preheader, logo, content, footer), and their order cannot be changed.
Within a container, you can insert elements (light background color in the element tree) in any order. For example, the "Content" container can be filled with various articles. Which elements are available in which container is also defined in the design template.
 |
|
When you move the mouse pointer over them, the icons in the header of each container offer the following functions:
- Plus: Inserts a new element into the current container. Which elements are available depends on the template used. You can add as many elements as you like, but you should not overload your newsletter.
- Minus: Removes all elements of the current container (after a confirmation prompt).
If the 'Contents' module is enabled in your account, another icon appears in front of the plus/minus icon. It lets you insert prepared content that you want to use identically in several mailings or landing pages, e.g. your legal notice. After selecting the content type you want, select a text block, which is then transferred directly into the created content. You create such a content block in the 'Modules' --> 'Contents' menu.
Each element has five icons to edit, move, lock, copy and delete it.
|
--> Note: By default, the full view of the email draft is displayed again after you insert a new element. Alternatively, you can switch directly to the edit view of the new element after adding it. You choose the default behavior in the menu at the top of the screen: 'Custom settings' --> 'System settings' --> 'Behavior after creating new elements'. Here you can choose between the options 'Insert element' and 'Edit element'.
The sample template has the following structure:
- Preheader: Technically, the preheader is nothing more than the first line of your mailing. In the inbox of many email clients, it is displayed as a preview together with the subject. So use the preheader as an extension of the subject line. It should spark additional curiosity. It should be followed by the usual link to the online view or web page view of the email. This lets the reader display the content of the email as a web page in their web browser.
- Logo and social media: Here you can place your logo, including a link, e.g. to your company website or a landing page.
- Content: You can start the main part of your email, for example, with an introduction consisting of a heading, text and an image (position right or left, as you choose). This could be followed by the personal salutation and then a content introduction that you use as a teaser for the following articles or that links, for example, to your company's news website. After that, several articles could follow, e.g. promoting individual products or containing visual separators.
- Footer: The legal notice and the unsubscribe link conclude your email.
As soon as you move the mouse pointer over the line of a content element, five icons appear to edit, move, lock, copy and delete this element.
- Edit element: Clicking the edit icon (or the name of the element) opens the detail view for editing the content. Its options for inserting text, images and links are explained in the next section, Editing content elements: the detail view.
--> Note on the changed saving behavior in the new editor:
After you click 'Apply', your changes are displayed immediately in the draft view, without having to save them on the server first (as before). emma takes care of this automatically in the background: your changes are saved on the server several times per minute and when you leave the draft view. If you prefer to save manually instead, change the corresponding setting in the 'Custom settings' --> 'System settings' --> 'Autosave' menu.
- Move element: To change the order of the elements within a container, click this icon and drag and drop the element up or down to the position you want.
- Copy element: Clicking this icon inserts an identical copy of the selected element directly below it.
- Delete element: Use this icon to remove the selected element (after a confirmation prompt).
- Lock element: Click this icon to lock the element against changes by other users who do not have the 'Allow editing of locked articles' right.
--> Tip: You can enlarge or reduce the width of the element tree by dragging the right edge of the element tree window.
--> The draft view
The draft view shows the draft of your email in its original size. To edit a specific content, click either the element you want in the element tree (see previous section) or the corresponding (green) icons directly in the draft view. This opens the edit view of this element. Its options for inserting text, images and links are explained in the next section, Editing content elements: the edit view.

You can enlarge or reduce the width of the draft view by dragging the right edge of the window between the mini view and the media sidebar.
--> Tip: As soon as you drag the window below a certain width, the draft is automatically displayed in the mobile view.
|
|
--> The mini preview
|

|
|
To the right of the large draft view, the 'Mini preview' shows a reduced overview of your draft.
You can move the visible section up and down with the mouse or click directly on it.
This way, you reach the position you want immediately, even in long mailings.
|
--> The media sidebar
On the right edge of the screen, the media sidebar shows all images and folders of your media administration. Here you can upload new image files and drag & drop images into the current mailing.
|

|
|
Upload new images:
- Click the button 'Upload new file'
or
- Drag & drop one or more image files from your Windows desktop (or Explorer) or Mac Finder onto the 'Drop file here' image icon
Drag an image into your mailing:
- On the left of the draft, open the element you want to edit.
- Then drag and drop the image you want from the media sidebar into the open edit view, either onto the input line of the image URL or onto the displayed preview image. This replaces the image set so far.
|
In the navigation bar above the folders, the name of the current folder is shown in bold. Click a folder to display its contents. Click 'Main folder' to return to the top of the folder navigation at any time. The 'Ignore Folders' button hides the folder structure and shows all images stored in the media administration together, regardless of the folder they are in.
Editing content: the detail view
After you click an element for editing in the element tree or in the draft view, its detail view opens. Here you insert your actual content, i.e. text, images and links.
The detail view contains the 'General' and 'Interests' tabs.

After you click 'Save' (previous editor) or 'Apply' (new editor), your changes are displayed in the draft view.
--> Note on the changed saving behavior in the new editor:
After you click 'Apply', your changes are displayed immediately in the draft view, without having to save them on the server first (as before). emma takes care of this automatically in the background: your changes are saved on the server several times per minute and when you leave the draft view. If you prefer to save manually instead, change the corresponding setting in the 'Custom settings' --> 'System settings' --> 'Autosave' menu.
Inserting text: formatting
You can enter text in the input fields provided for this purpose. Line breaks are applied automatically. If you want to use different formatting such as 'bold', 'italic' or 'underlined', simply select the text and click the corresponding icon.
 |
Inserting text: font sizes
Click the 'Change font size' icon (A). You can adjust the size individually in whole numbers. The number must always be followed by 'px' (for "pixels").
Example: [SPAN style='font-size:10px']Text with a size of 10 pixels[/SPAN]
Inserting text: font colors
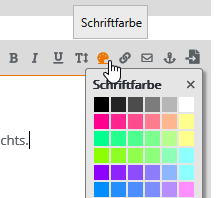
You can choose font colors using the small button with the brush icon. Simply select the text and choose a color.
|
 |
|
With the placeholder, the colored area then looks like this:
[SPAN style='color:#ff0000']This will be red text.[/SPAN]
You can find a color table with the corresponding HEX color codes here:
http://www.dauerstress.de/homepagehilfe/farben-generator.php
Please note that the hash sign must always precede the 6-digit code!
Inserting links
Links to websites are inserted using the link icon  . Select the text you want to link, e.g. the word "Google". Then click the icon and enter the target URL in the address field, e.g. "http://www.google.de".
Important: Every website link must start with http:// or https://, i.e. entering "www.google.de" is not sufficient.
To make the inserted link trackable in the statistics, either the default setting 'Use global tracking settings' must be activated or, if you want to force tracking for this link, the 'Tracking active' option.
Optionally, enter a comment as an additional label for your link. Using different comments, you can evaluate clicks separately even if the same link URL is used several times, e.g. whether the recipient clicked the link to the online shop in the article text or in the navigation menu of the email.
You define the effect of the 'Use global tracking settings' option in the 'Advanced settings' of the mailing, in the 'Tracking' section. 'Automatic link tracking in HTML part' should be activated there.
|
 |
|
Email links are not tracked, which is why there is a separate button for them: 
The same applies here: first select the text and then enter the email address in the dialog.
Example: [LINK mailto='test@Sparkassen Finanzportal.de']Email[/LINK]
|
 |
|
Explanation:
- Tracked link: After the mailing has been sent, you can view the recipients' click rates in the statistics under the 'Performance evaluation' menu item.
- Link with comment: The comment is displayed in the statistics instead of the link name. This is clearer, for example, for long link paths.
You can also store a tracking code from your web analytics tool in the advanced settings, and emma automatically adds it to all external links in the mailing.
|
Style attributes
With knowledge of HTML and CSS, you can make further individual adjustments using style attributes. There are many options for formatting with CSS styles. You can find the corresponding commands on this free website:
http://www.css4you.de
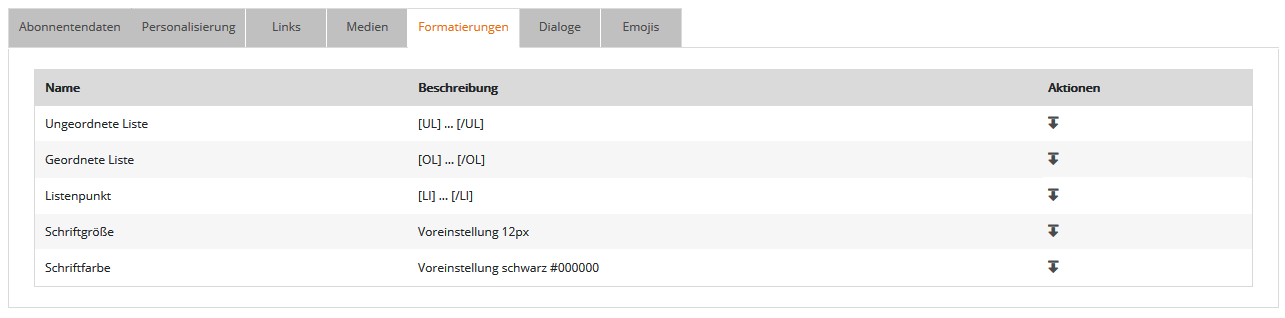
In the input assistance, the 'Formatting' tab contains the 'Span' option. You can use it to apply CSS. When inserted, the placeholder looks like this:
[SPAN id='...' class='...' style='...']Text in capital letters[/SPAN]
Now decide whether you want to assign an 'id' or 'class' or write the style attributes directly into the style attribute. If, for example, you want to set a text in capital letters, use the attribute: 'text-transform: uppercase'
Example: [SPAN style='text-transform: uppercase;']TEXT IN CAPITAL LETTERS.[/SPAN]
You can also combine several attributes. Please use the semicolon (;) as the separator.
|
 |
Inserting lists
If you want to split a text into list items, proceed as follows: select the entire text that is to be defined as a list with the mouse and, in the 'Input assistance' --> 'Formatting' tab, first select the 'unordered list' or 'ordered list' command.
Example:
- unordered list (list with bullet points)
[UL]Self-promotion is part of the job Understanding and interpreting customers sensibly Conducting successful conversations Sensible goals and successful strategies Clear organization in the company[/UL]
- ordered list (numbered list)
[OL]Self-promotion is part of the job Understanding and interpreting customers sensibly Conducting successful conversations Sensible goals and successful strategies Clear organization in the company[/OL]
Then you need to assign the individual list items. To do this, select each list item individually with the mouse and, in the 'Input assistance' menu --> 'Formatting' tab, select list item.
Example:
[UL][LI]Self-promotion is part of the job[/LI]
[LI]Understanding and interpreting customers sensibly[/LI]
[LI]Conducting successful conversations[/LI]
[LI]Sensible goals and successful strategies[/LI]
[LI]Clear organization in the company[/LI][/UL]
[UL] marks the beginning of the entire list and [/UL] its end. [LI] is the start of an individual list item and [/LI] its end.
Inserting images
Click an image element of your template in the draft view to open a pop-up window for editing the image details. Use the 'Input assistance' to insert the image you want from your Media administration, or click the 'Upload' button to upload a new image. If the template provides for linking the image, enter the link URL of the image.
Important note on image size: Depending on the template, you can use the 'Image width' and 'Image height' input fields to define the size at which the image is displayed in the mailing. The size of the image file used for sending remains unchanged. So make sure to reduce large image files in particular to the planned display size. The functions for cropping and resizing the image are available directly in the 'Media administration'.
In the 'Alternative text' field, enter the text to be displayed instead of the image, e.g. if the subscriber has blocked the loading of images.
Finally, click 'Save'. With a template, the HTML and text parts are generated automatically.
Inserting an attachment
To add an attachment to your mailing, proceed as follows:
- Upload the file to be attached under 'Modules' -> 'Media administration'.
- Open the mailing you want under 'Mailings' --> 'Email'.
- On the 'Attachment' tab, select the file from the media administration. emma lets you create attachments for selected 'Target groups'. This way, each target group receives the attachment tailored to it.
|
Preview of your mailing
Clicking 'Show preview' (top right) opens the personalized preview of your mailing.
'Contents' tab: the previous editor
The differences between the previous and the new editor are described at the beginning of this page.
On the left, you see the content elements of your mailing. You can edit, delete or insert each element several times. Which elements are available is determined by the programming of the selected template.
|

|
|
Using demo template 1 as an example, we describe three typical elements:
Introduction: You can add a heading, text, a link and an image to it, as you choose. Use introduction elements for the greeting and for short teaser texts that link, for example, to your company's news website.
Article with image on the left: There are usually several variants of articles. Typically, they contain a heading, text and optionally an image, in this case positioned on the left. You can also use articles to insert visual separators.
Link bar: Here you create prominently placed links that lead, for example, to the legal notice on your company website or to a landing page.
|
|
| |
|
When you open an element, there is no difference between the previous and the new editor when entering text etc., see the section 'Editing content elements: the detail view'.
The same applies to the preview.
|


